Sunday, June 12, 2011

Cantaloupe on a Trellis

I've been reading online about doing cantaloupes in a container garden, and one site mentioned that you could grow them in less space if you'd train your cantaloupes to grow up a trellis. I stopped on the way home from work the other night and bought two of them. There was a lot of trellises to choose from—wooden ones, plastic ones, fan shaped aluminum ones. I knew I wanted something tall, so I nixed the idea of the 3 and 4 foot versions. There were a lot of wooden ones with diagonal slats hanging on a rack waaaay over my head, but some of them had loose slats already, or slats that had come apart from the outer frame, They were unpainted and looked pretty cheaply made for the price. I didn't want something that was going to last only last one summer. Here's what I got:

They're nicely made, and I liked the idea of NOT having the 2 inch wide slats creating a lot of shade. Plus, I needed a trellis that had horizontal bars as well as vertical bars. Supposedly, when the cantaloupe get baseball sized, you use pantyhose or plastic mesh to make a sling on the trellis to support them, to take the weight off the vine. I have lots of the bird netting I put on my tomato bush, so I'll probably use some of that.

Here's my cantaloupes right now, I've used some saved selvedge to gently encourage the vines to grow toward the trellis. They're not knotted tightly, so I'll be able to shift them as the vines grow. This is my first year for cantaloupe, and I didn't know that the plant has those little curly tendril things like the snowpeas do, to connect them and help them grow up.

And one last garden shot - these are my yellow bell peppers, at golfball size. I wonder how long it'll take them to get ripe? I've never grown them before.

In other news, I've eaten LOTS of cherry tomatoes so far, and handfuls of snow peas. Oh, and three banana peppers. I love it when stuff starts getting ripe, and I can't wait for my first big tomato of the year. :)

Monday, May 30, 2011

A Memorial Day finish

Finally got the binding done on this one—and it's been sitting for YEARS waiting to be bound. I'm such a procrastinator. Had the binding right in the bag with the quilt all this time.


And I was delightfully WRONG about my snowpeas, I ate the first of them today. I know two of them is not a serving, but surely eating them warm and crunchy right off the vine is just as good as a vitamin?

Sunday, May 29, 2011

End of May Garden update

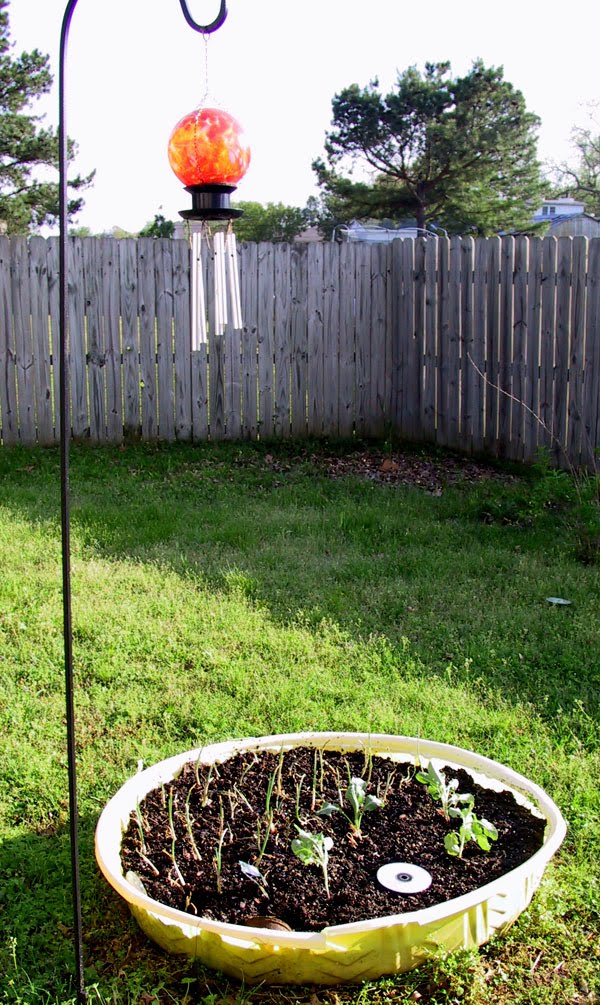
Well, it's the end of May, and here's the State of the Container Garden. My onions are doing okay, and the cauliflower in the wading pool with them are nicely leafy - but no cauliflower showing yet. I keep peeking down into the middle of the leaves, hoping to see something down there, but nothing.

The Better Boy tomato plant has several small and these two bigger green tomatoes:

I have this one nice sized banana pepper (about three inches long) and lots of buds and little ones that're about the size of the end of your pinky finger:


My snowpeas are blooming and there's lots of tiny snowpeas started, all about an inch long, so by June 1, betcha I'll be eating my first snowpea:

Here's the cantaloupe, nothing but lots of green leaves. I'm a long way from needing to trellis these, aren't I? I'm going to try growing them up, and suspending the melons in little mesh sacks attached to the trellis.

The yellow bell pepper plant isn't as far along as the banana pepper, it's just now starting to have little buds:

As for my other tomatoes, they're not doing as well. The Bonnie Original has a couple of little tomatoes on it, as does the yellow pear tomato and the Beefsteak tomato. The winner for this season, so far, is the Cherry tomato. It's thick with tomatoes of all sizes. I've had ONE ripe tomato from this bush so far, the birds pecked holes in several others. Now I've got it surrounded by bird netting. It's difficult to see unless you look at the CD there in the pot:


People have asked me about the CD's. I had heard they'd be birdscare, that the birds would see their reflection and fly away. It hasn't worked this year! I do like watering with them in there though, if you water on the CD, the stream from the hose doesn't dig holes in the dirt, instead it splatters out flat, if that makes sense.

How does YOUR garden grow?

Saturday, May 28, 2011

First Tomato and hotpads

I made a couple of hotpads for Mom for Mother's Day, picking colors that were nice for spring. Here she is holding them:


And here's a closeup. I used some 100% cotton toweling in the middle of the bargello style one, which makes it pretty heatproof. Making a hotpad is a good use for these prairie point stars, since all the layers of fabric are too much for a quilt top anyway. This one didn't need any layers added! Anyone else made one of those way back when?


And here's my first ripe tomato! It's only a cherry tomato, but it was very good. :D

Wednesday, May 04, 2011

Quilts, Tomatoes, Pepper buds!

Ready for some garden pictures? Here's my banana pepper plant, with lots of buds all tucked in the center there. I bet I'll have blooms soon!


Again with the cherry tomato plant, from the top this time, with four easy to spot little green tomatoes, and a few more hiding in the leaves if you really hunt for them.


And last, the current quilt I'm working on. I can't share the whole thing with you, because it's a yet-unpublished pattern from Quiltmaker magazine that the Scrap Squad is doing. But here's a photoshopped picture that gives you a teaser of the colors of batiks that I'm using:

Monday, April 25, 2011

Easter Garden Update

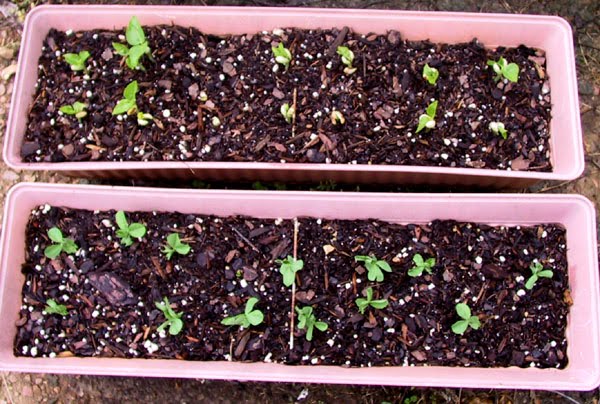
Hope everyone had a good holiday! I was off Friday, had to work Saturday, so it was a short weekend for me, but I did get a little gardening done. Here's my peas on 4.20.11, snow peas on the bottom and black-eye peas on the top. Too many people have been telling me that that's too many to grow in a windowbox.


Here's the same peas 4 days later, to me that seems like a HUGE difference in size of the leaves. I love watching them grow, lol. The snowpeas are vines, and I'll put up a cage for them to grow on, I'm not worried about them. But yeah, I had to agree, the black-eye peas being bushes, they were probably going to quickly outgrow the planter.


So I bought ONE more container, a cheap dishpan from the dollar store, punched some holes in the bottom—to be honest, I cracked a big split in the bottom when I went to punch the holes. I guess I was either too enthusiastic or the dishpan was really cheap! Anyway, I transplanted three of the black-eye pea bushes in there, and put another in the wading pool, in an empty spot next to the cauliflower.

Here's my Husky Red Cherry tomato plant. It gets blog space because it has the most blooms. ;)


I don't know if the recent cool nights we've had (chilly, but all above freezing) will mean these blooms will set fruit or not. Have to wait and see!


And last, the picture above is the current state of the cantaloupe. I know four plants per big container may be too much, but I can always hack one out later, right? Perhaps eliminate the smallest one, or the one with no cantaloupes on it? But I saw online where I can get a trellis to train the vines on, then hang the cantaloupes from the trellis in net bags or pantyhose sections, and that keeps them off the ground, too. Supposedly less chance of mildew or mold.

Sunday, April 10, 2011

More Spring Planting

Went and spent some hard-earned cash at Home Depot last night on the way home from work. Then had to haul the two big bags of dirt, a new plant pot, one more tomato cage, some seeds, and three more plants around to the back patio. Here's what I ended up with. First, that banana pepper plant I said I still wanted:


I was also tempted to try yellow pear tomatoes this year. I think it was Tazzie that mentioned them in response to my problem with birds—because these tomatoes don't get red, birds're less attracted to them. They're about the size of cherry tomatoes, but longer, with an added pear shaped blob. Supposed to taste great too!


I also got some Vidalia onions, a whole little round blob of them. I think you call them starters? Then on my way to the front of the store, I passed a rack with more plants and I couldn't resist some early cauliflowers. These are supposed to be done in 50 days, so if that's true, I'll get a harvest at the beginning of June, before it gets too hot for them. I put those in the wading pool, onions toward the back:


I had so many onions that I put a few in some of the tomato containers, around the edges. It seems like my tomatoes always grow pretty tall, and the roots never extend out to the top edge of the containers, (I plant them deep) so maybe the pairing will work.

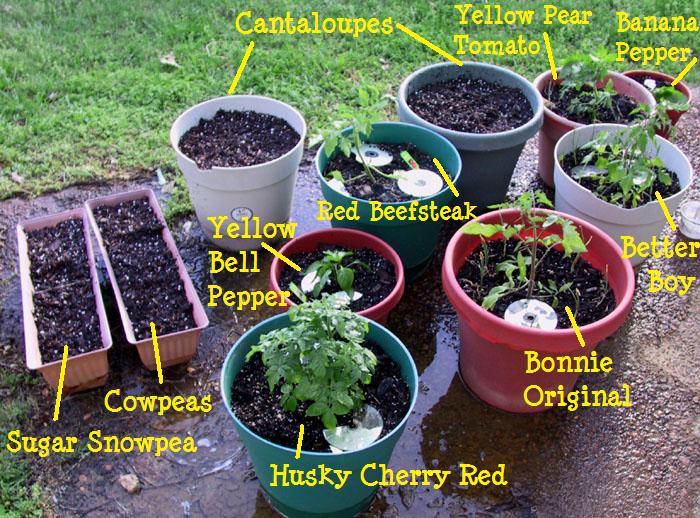
So here's the state of my containers now, and I think this'll do me for the summer. I'm not at all sure about the cowpeas in the windowbox—the snow peas do wonderfully there, so maybe these will too? And the cantaloupe in containers is new for me. I may need to get tomato cages for them, and suspend the cantaloupes from the wire with little net bags? I'll have to do some research. All suggestions welcome! How does YOUR garden grow?

Tuesday, April 05, 2011

Giveaway Winner and April Block of the Month

Yaaay! Using the Random Number Generator at Random.org I've picked the winner for the free Julie Herman pattern giveaway! First here's the (lucky or unlucky, however you look at it) number:


And counting down 13 on my blog comments, I come to Jennifer! She blogs over at Hoodies and Flipflops
if you wanted to go say hi. Congrats, Jennifer! If you'll send me your address, I'll pass it on to get the pattern to you.

I've also been working on the block of the month for my quilt guild. It's all online, if any of you wanted to follow along, or even if you just want to try a block or two. Not quite as . . . vivid . . . as it appears in this picture, let me introduce Block two of the Sweet Sixteen series:


And a graphic for what it looked like when I drew it up in EQ. Here's the website page with the instructions and fabric cutting directions for the April 2011 block of the month. Enjoy! And if you decide to try this block, I'd love to see a picture of the finished project.

Saturday, April 02, 2011

It's Garden Time!

It's April, so that means all my quilting friends are going to have to put up with garden updates again. :) I enjoy my little foray into container gardening, and it's really no trouble to do, once it's set up. And setting it up is NOT that difficult, nor does it take much space, money or time.

First, here's the wading pool. I started using it three years ago, as a cheap alternative to a raised bed. This spring, I'm using it to plant onions, (little green onions, around the edge) and I'm going to try cantaloupe in the middle. I need to add some fertilizer and give it a good stir before I plant the seeds tomorrow.


I think this will be the last year for the wading pool. These pools are really cheap, but not meant to last several summers. The plastic around the edge that's been exposed to the sun is disintegrating. Since I've enjoyed the fruits and veggies of my labors, I think next year, the pool will come out, and I'll upgrade to a raised wooden bed. Maybe even put in some strawberries and asparagus, which take more than a year to grow, and keep coming back.

Walmart had four varities of tomatoes this year that looked good. I prefer indeterminate plants that yeild all summer instead of the determinate ones that grow tomatoes that ripen all at once. Here's the four I have so far:

*drumroll* In the beige container, the Better Boy. I've grown these before, and they did well.


This next one's a new variety (cultivar, is that the right word?) for me, it's called 'Bonnie Original' and I'll have to see how it tastes.


Red Beefsteak is also a new one for me, and I'll admit I bought it just because of the name. Doesn't 'beefsteak' sound like it'll be a huge, ripe juicy tomato? The name made me salivate, so I bought the plant, lol.


And finally, a Husky Red Cherry tomato bush. This was the first variety of tomato I tried to plant in containers, and they're great. I can eat these all by themselves or in a salad, and the plant's pretty prolific too.


Then I'm trying one more new thing this year, yellow bell peppers. Last year I had two banana pepper plants and there were just too many banana peppers for one person to eat. I shared handfuls with the neighbors, and pickled some, too. I didn't see any banana pepper plants out at the store yet, but I did see these, and thought, hmm. Stuffed bell peppers, yum!


I still plan on getting a banana pepper plant when they're available. cuz I love those things. And possibly another tomato plant, maybe a grape tomato again? I have plenty of time to decide. Any suggestions for other crops I could attempt in containers?

Wednesday, March 30, 2011

Pineapple Blossom and Raspberry Variation

Remember, you've got until the 4th of April to post a comment on my blog for a chance to win the free pattern from Julie Herman. Plus, don't forget to go over to the Quilty Pleasures Blog to post for a chance at some free fabric. ;)

Here's an indoor shot of my Raspberry Dessert variation - the library shelves make excellent quilt hangers:


And here's the current state of that pineapple blossom quilt I started at Bonnie Hunter's class in Jackson TN. I decided to make it 3x3 (or six by six, depending on how you count the blocks) before I added the border, so this last week, I've made and added on 12 more twelve inch blocks.


Tomorrow after work, I'm going to head to Home Depot and Walmart to check out their seeds and seedlings. It's almost April, and time to start thinking Garden! Tomatoes! Banana Peppers! SnowPeas! Hey, have any of you ever grown cantaloupe in a container garden?

Monday, March 28, 2011

Raspberry Desserts and Giveaways!

Well, here it is, the reveal date for the second Quiltmaker Scrap Squad project. I'm glad I was picked to be on this team, it's been lots of fun so far. For the last two months, we've been working on a pattern by Julie Herman of Jaybird Quilts. This one is called Raspberry Desserts (she did it in pinks and creams) but if you'll click around the other scrap squad blogs, you can see that it looks great both color controlled and scrappy! She also has some wonderful patterns on her site that look great in scrappy, look around while you're there.

I decided to do mine with a dark background, rows of blocks with jewel tone colors bordering scrappy insides. Then I used the same fabrics in the scrappy braided border:


Mine's not quilted yet - and before I send it off to my longarmer, I may add another braided border all the way around. I used my Accuquilt GO! to cut the chisel shapes that became the braid, and it was SO easy to cut the right and left shapes. And addictive, almost hypnotic, to keep sewing the braid, chaining them through the machine.

I also changed the setting of the Julie's blocks - instead of putting them on point with setting triangles, I set them square. I think it would have been neat to do them with smaller strips too, really scrappy against white, maybe I'll try that someday.

Now for the Giveaways!

Julie has given the eight of us on the scrap squad each a pattern to give away FREE. So comment on my blog between now and April 4 (that gives you a week to comment) then I'll use a random number generator to pick one of you to receive the pattern. Make sure your response is set so I can reply to your comment if you win! Then go hop around the scrap squad blogs and comment on theirs too (links on my sidebar) for MORE chances to win a free pattern.

AND it doesn't stop there!

Quilty Pleasures blog, over at quiltmaker.com, is having a fabric giveaway. Yup, FABRIC! Run over there and follow the instructions to be entered for that too!

Monday, March 14, 2011

Pineapple Blossom Progress

There, I've sewn together the first twenty-four blocks, but you can only see a few here. I love the way the orange/yellow/pink batik looks in the large segments. Almost like a sunrise. I started this last Saturday, in Bonnie Hunter's class, and it came along really fast. It's been a long time since I made a quilt with only three fabrics. Working with the batiks and white was a treat too, there was no right or wrong side, no almost invisible white-on-white print to search for either!


Toby decided that the hanging quilt-center was put up for HIM to play behind. See the bump at the bottom left corner? That bump's name is Toby.

I'll add a two-inch border of that aqua-turquoise. I also have finished part of 24 pinwheels from the bonus triangles, they'll go in a thick white border surrounding the whole quilt. I haven't decided if I want to put the pinwheels on point, or make them wonky or... space them evenly or... ? Any suggestions? When I put four of the bonus triangles together to make a pinwheel, the block finishes at 7 inches.

Monday, March 07, 2011

Meeting Bonnie Hunter in Jackson, TN

I had the great honor of joining the Jackson TN Peace by Piece quilt guild as they hosted Bonnie Hunter. Her lecture and trunk show was fantabulous! Even though I'd already heard of the Scrap User's system, it was a treat to see Bonnie in person as she worked the crowd. She had them rapt—actively listening, laughing, nodding to her words, and responding to her questions.


That quilt on the wall behind her is such a clever idea. It shows the sizes of light and dark strips and squares she cuts most of her scraps into, and UNDER the different sized strips, she made some sample blocks from those units. It's a great visual aid to her trunk show and lecture!


I think the picture above is the 'quilt holder' pose ... Bonnie's both sweet and funny in person. :)


Even though I only had met one person in the class before (Patty, on the left) everyone at the Jackson guild was very friendly and hospitable. I appreciate their letting me join them!


Here's the eight pineapple blossom blocks I finished, spread out on the bed in my hotel room. I'm making 24 twelve-inch blocks, then I'll decide if I want to make more, and what I want to do with the border. And yes, I did more than eight total, but these were completely finished ... the rest are in different stages of being done.

Tuesday, March 01, 2011

Scrap Squad Teaser and Block of the Month

Still can't show you the Quiltmaker magazine pattern I'm working on, but just to tease you, here's some MORE of the fabrics I'm using.

These past two nights, I've also been working on the website for my guild. I put up a block almost every month, and the next series of blocks is starting TODAY. Here's block one. First the EQ drawing of what I designed:

And then here's the actual block, made out of fabric:


If you want to play around with us, it's all free, online at the Uncommon Threads guild website, just scroll down to see the block of the month links. The January page has some sample layouts and color options, and the March page starts you with cutting directions and instructions on the first block. Wouldn't you like to join us?

Saturday, February 26, 2011

How to Quilt it?

I finished reading my book for the evening (a Sharon Sala young adult offering was what I was copyediting,and very good it was too, I didn't want the story to end.) Then I decided to do some quilting.

So I pulled out my block of the month wallhanging that I did with the twelve stars from 2011. Added a one inch border to the edges, with four little pastel corner squares. Cut me some white for backing, a square of bamboo/cotton batting, and got it all sandwiched and pinned together. Then I froze:

How on earth should I quilt the thing? It's only 26 inches square, so I'll do it myself on my domestic machine instead of sending it out; but I'm petrified to set needle to cloth! I could put the walking foot on and quilt in the ditch easy enough, but somehow I don't think this one is calling for straight lines. Help! What's easy enough that a beginning machine quilter could tackle it without messing it up? Suggestions?

Thursday, February 24, 2011

Storywonk

Have you ever thought you could write a novel that’s just as good as the ones you’re reading? Or better? Then you tried to write and got bogged down at getting it all down into your word processor. Your romance went flat or your characters dull. You want to pick up some writing tips and skills, but who has time for classes in this busy world? Here’s a solution:
Go to www.storywonk.com and check out their seminars, classes and workshops. Minimal fees, and you can enjoy them in the comfort of your own home, in your jammies, if you want. Most events are scheduled on Sunday afternoons, if you have plans, you can download them later. The classes have assignments, whereas the seminars are one afternoon only.

Why am I frontin’ for Storywonk? Well, for one, I like Lani’s books. I glommed onto her after reading Dogs and Goddesses, a book she’d collaborated on with Jenny Crusie and Anne Stuart, another couple of my favorite NYT bestselling authors. Then I picked up some of Lani’s own books and enjoyed them too, especially one titled The Fortune Quilt. I started following her blog online; always real, sometimes evocative, sometimes amusing, generally entertaining. AND, she’s having a contest. Out of all the people who repost about Storywonk, she’ll pick a few for a chance to attend a free seminar. That’s what I’m aiming for. Free.

Maybe go enter the contest yourself. Take a look at some of the topics and educational opps that Storywonk’s offering. Maybe you’ll be the next NYT bestselling author I follow on facebook.

Tuesday, February 15, 2011

Braid-Making

I've been braid making tonight! I think I'm about half done with the lengths I'll need.

This is the kind of project I'd never have done without the Accuquilt. Cutting all those right and left tilting wedges by hand? eww. But the cutter makes it so fast to cut hundreds of them. And sewing them together goes fast and accurate too, since all the little dogear corners are already cut off for you.


I can't show you the quilt these are going to border yet, we have to keep it a secret until the day before Quiltmaker magazine subscriptions are supposed to come out. But I'll have a dark navy skinny border between this and the quilt center, then more dark final border on the outside. So even though this looks like a really scrappy hodgepodge of fabrics, surrounding it with navy will tame it down some. And even though you see some fabrics directly across from each other in the pic, they won't be on the final quilt. I'm planning to have the top braid pointing right, the side braid pointing south, the bottom braid pointing left, and the other side braid pointing up. Does that make sense?

Wednesday, February 09, 2011

Books and Potholders and Quilting

Been busy! Have you?
First, I got a PACKAGE today - a book from one of my favorite authors, Sharon Sala. Doesn't Toby look like he's telling Libby, "Another book? Where's Jane going to put all these?" Anyway, Sharon sent me that pink one on the end, and it's autographed, too!


I've been adding some of my favorite authors to my facebook friends because it's cool to see updates from them and learn about the day to day lives of these famous folks. I told Sharon I was looking to order Blown Away because I couldn't find it in the stores. I'd already bought Torn Apart and Swept Aside (the aqua and the yellow books, second and third in the series) and told her I didn't want to read them until I'd read the first. She very kindly offered to mail me the pink one, Blown Away. I'm already 150+ pages into it, until I made myself stop so I wouldn't gulp it all down in a day.

Sharon writes really good romantic suspense. At least these three are, some of what she's written could be romantic comedy. Both Whippoorwill and Amen Trail by her made me laugh out loud. :) If you haven't ever read anything by her, give her a try.

In other news, I'm also making a couple of Valentine themed potholders for gifts. Super simple project. I'll put a couple thicknesses of terry or flannel inside, and some of that silver ironing-board cover for a backing so they'll be heat proof.


The eight of us on the Quiltmaker Magazine Scrap Squad already have our next pattern to make, and I'm busy cutting strips and squares from all my scraps. Here's a few of the fabrics I'm using. That navy blue is the only thing I purchased, for background. The rest will all be from stuff I already have. I really like the design we're making this time. Sorry I can't show you more of it, but it's a secret until the magazine comes out. Stay tuned!

Related Posts Plugin for WordPress, Blogger...