Monday, April 27, 2009

Wallhanging almost finished!

This is the mystery quilt I started last Nov. at our retreat. Everyone else did it in three-inch squares, but I didn't want a huge wallhanging, so I scaled it down to one-inch squares. I left the fence hinge (well, ok, the GATE hinge) on the pic so you could get some idea of scale. It finished at 27 inches square.


I don't do much machine quilting, so this was a challenge to me, making teeny loops and squiggles around the little half-square triangles. None of the green or brown in the center of the quilt has any quilting, so they puff out a bit, compared to the flat quilted white areas.

And I machine sewed the binding - have you guys seen the funny blog post on binding tutorials? I couldn't help but laugh at it:

Binding Tutorial Spoof

Finally, here's another flower picture from my yard. The wire trellis I borrowed from my sugar peas is keeping them all upright this year, and they look much better:


I love my peony bush, and I'd take some into work for others to enjoy if it weren't for the ANTS! Tiny little black ones that like my peonies as much as I do! I took 4 huge blooms in a couple of years ago, having put them upside down in a bucketful of water for an hour first, hoping to drown the ants, or at least chase them off. Didn't work, and I was thumbing ants to death on my desk at the library all day. :D

Anybody have a solution? I don't want to use ant spray, the flowers would smell bad, instead of sweet, like they do now.

Sunday, April 26, 2009

Veggies and Tomatoes

Anyone ready for a status update on my tomatoes? Here's the Early Girl. I read a couple of reviews online after I bought this one, that said the tomatoes were early, but not as good as the tomatoes from plants that ripened a couple of weeks later. If I'd known that, I may have gotten something else, flavor is the most important reason I am growing my own.


Blooms on my Cherry tomato plant! Last year I got Husky Cherry Red, and enjoyed them very much, we'll see what difference there is between the two. I almost got a grape tomato plant too, I can buy a container of those at the store and eat almost the whole pint in one sitting. Maybe next year.


Here's the Better Boy, and I've heard only good reviews about this one. I'm actually thinking, if they all have blooms right now, don't you suppose all three of these plants will end up having tomatoes at the same time?


And I posted this one last, so you could easily see the difference between the previous week and this week - what a difference only a few days makes on my snow peas! A trellis that I bought for the peas is around the front of the house, holding up my peony bush. Those blooms get so huge that the flowers usually get too heavy for the stalks and arc down till they touch the ground. Now, watching these grow so fast, I'm hoping their blooming time will end before my snowpeas get tall enough to need the support!

Friday, April 24, 2009

Veggies and Flowers

Well, ok, they're not veggies quite YET... :)

But these will be my snowpeas:

And these the crookneck squash:


This is what Toby was watching from the front window, some yellow iris I planted ten years ago. I love stuff that comes back year after year that you don't have to keep planting, don't you?


As for my three tomato plants, the Early Girl has big blooms, the Better Boy has smaller blooms, and the Cherry tomato nothing yet, but it's still early. I'll try to get pictures of them later this weekend.

Are any of you planting container gardens?

Monday, April 20, 2009

Seminole Patchwork

Here's my first try at Seminole patchwork!

I've decided to have a Seminole strip in the Block of the Month strip quilt I'm doing with my guild. Since I'm offering it in several sizes, I'm giving them the choice to do a narrow, 2 inch strip, or a slightly wider 4 inch strip:


Because I had to test the sizes first, I'm doing both for my quilt. :) Some of the more complicated Seminole patchwork was really impressive, but I decided to do an easy one. If you'd like a sneak preview of the block of the month instructions that will be given to the guild at the end of April, here's the link:

Block of the Month for May, 2009

And of course, all the instructions for the previous four rows are on the guild's website at www.ucquilts.com

Ready for another Toby birdwatching picture? He thinks when he sits behind the curtain in the front window that he's hidden - unaware that he's totally exposed to the anybody at the front of the house... :) I have a bed of yellow and purple iris that are blooming there, so right now, the stalks are tall and green, lots to watch!

Saturday, April 11, 2009

Container Gardening Again

Well, here I go again - pictures of my little excuse for a garden. I enjoyed growing three tomato plants last year, so THIS year, I'm doubling the size of the garden, adding several more containers.

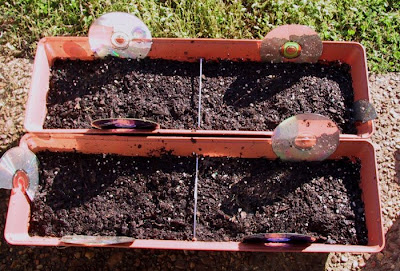
I'm trying some snow peas in window boxes. I saw online where it's supposed to work... :) When they get big enough, I have a trellis thing I'm going to put between the boxes, for the peas to climb. The package says you can usually get two crops, start one in Spring, and start one in late Summer.


I'm also going to try a couple of containers of crookneck squash - I know there's not much dirt in here, after they come up, I'll add some more - I may even move them to something bigger, like a kiddie plastic wading pool with some holes drilled for drainage.


Here's the three tomatoes I decided on. An Early Girl, this one already has teeny blooms about to open:


A Sweet Cherry Red. There were two plants in the same pot, but they were planted so close together that I hesitated trying to separate them, I was afraid I'd tear up the roots for both. If it gets to be too much for the container, I may have to cut the smaller one out later.


And last, a Better Boy. They all look a little short now, but the instructions on the pot said to plant them deep, so I did.


And just for the regular readers of my blog... remember when I put the whole raw egg under all my tomato plants last year? When I dug out the old dirt from the pots this year, I was especially attentive to watch and see how much of the egg was left, and what had happened to it. All three eggs were flattened, you could see grayish bits of shell in almost a deflated water-balloon shape. None of the three eggs were surrounded by especially dense concentrations of root. I didn't put eggs in the containers this year, so I'll see if there will be a difference.

Friday, April 10, 2009

Kitty Pix

The weather in Memphis has been alternately nice and nasty. Today we're under a tornado watch, we had thunderstorms with hail this morning... but just last week we had a couple of lovely, sunny days with temps in the 70's. Both cats enjoyed sitting in the open windows, snifffffing long sniffs thru the screen.

First, here's Libby. This was just prior to a sneeze. I think she must have inhaled some pollen. :D


Below is Toby, and the sun on his window moves off to the left as the afternoon progresses.

*sings* ...but tomorrow may rain, so, I'll follow the sun....


I keep thinking he's going to fall off the window, but he hasn't yet!


Sometimes I think see Libby looking over at him and smirking at the poses he contorts himself into, to get the last dregs of warmth:

Saturday, April 04, 2009

Clutch Wallet

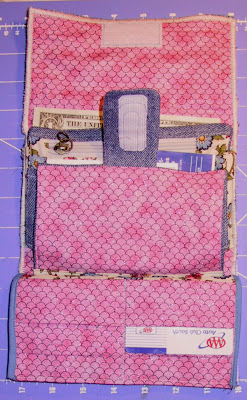
My old wallet was just about to bite the dust... and the ones I saw in stores didn't have all the features my old one did. I like zippers and hidden pockets and velcro and lots of space for credit and ID cards. Sooo, I decided to try to make my own. I had bought two old purses at a garage sale for a quarter each, and that's where I got all the zippers and accessories.


A money slot first (and that dictated how wide the wallet had to be) with a zippered pouch for coins in front of it, and a pocket for stamps and stuff. You can't see it from the picture, but the dollar slot has a fold of fabric on either side, so it accordians out. I unpicked the plastic for the card slot on the bottom from the old purse, and used that AAA card to get the size right. That's where my driver's license will be.


Then I made a different 'page' that has four slots on either side for credit and ID cards. The velcro tab you see closes that half of the clutch, so when I'm getting money out, the cards don't flop open. There's also a hidden big pocket under this whole section here.


When the card page is flipped to the other side, there's a long pocket for my checkbook.


Here it is shut halfway, and below, completely closed.


There's another pocket on the front, with a second zipper repurposed from the same garage sale purse.

The only thing I don't like about it is the edges. I'd planned on putting some bias tape to finish it, but the card page had to be two cards wide, which meant it barely fit. I had just enough room to zigzag past it, but I'd never get bias tape on nicely. There's so much denim in this that it'd be a booger to hand sew bias edging on. If I ever do it again, I'll make the wallet ½ an inch wider, and that would give me more room to finish the edges. :) Live and learn!
Related Posts Plugin for WordPress, Blogger...