Saturday, December 17, 2011

More Catching Up

Last of the garden harvest was these onions. It was fun digging for them, like having an Easter egg hunt. ;)

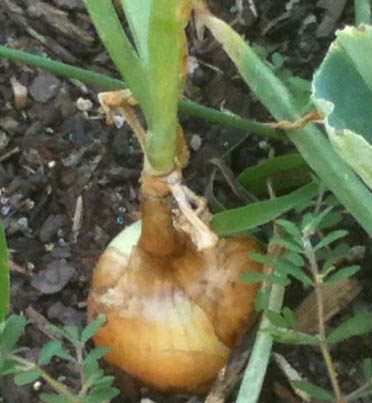
They didn't get as big as 'normal' onions you'd get in the supermarket, did they? But I decided I honestly liked the small sizes. Sometimes onions give me digestive problems, especially if I eat a lot of them, or if I eat more than one one raw ring on a hamburger. Which is a shame, because I love the taste and smell of onions, if I could, I'd be eating them raw on subs and slicing them for my salads, putting handfuls in my soup, etc. But anyway, these little onions were just perfect for me. I could add one small onion to a skillet or casserole and then I didn't have a lot of raw onion left over stinking up the fridge and getting dried out. I gave half of them to my neighbors, and stuck the other half in the fridge.


And I'm only a bit late on revealing another quilt I did for Quiltmaker magazine. I have always wanted to try a gradient, and with Diane Harris' generous stash enhancement of some BEAUTIFUL blue batiks, I planned this in EQ:


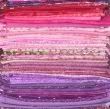
There's everything in this quilt, a huge variety of blues. Some of them were used in my mom's blue and beige quilt, s couple of the batiks in the Linkin' Logs quilt, some of them calicoes I'd had in my stash forever. You can read more about the fabrics and design process on Quiltmaker Magazine's blog, Diane Harris did another super writeup about it. Here's a closeup of some of the fabrics I used:


And here's what the actual quilt came out as. I realized it wasn't going to be bed-sized unless I added another border after the flying geese, so I came up with the tumbler gradient idea. I love the tumbler die I got from accuquilt, the small 3 inch size. It was a great way to have a scrappy but cohesive border.


Before I used the tumblers as a border, I had to see how they went together and how long a section of 2 of them was, or ten units in a row, so I could plan how many to cut. They went together so well it was almost goof-proof. Having the dog ears cut off the corners really helps the accuracy! So before I knew it, I had this many on my design wall:


And here it is with a final border of tumblers on it - almost looks like stained glass with all the different colors being backlit by the light from the window, doesn't it?

Friday, December 16, 2011

Bad Blogger, bad blogger!

I haven't posted in months - I've spent more time on facebook than on my blog. I did realize that I ought to be doing both, because I like my blog for use as an online journal. I like being able to go back and read about when I was working on a quilt, when I finished it, etc.

So a little catchup is in order.

Here's the EQ design of the Quiltmaker quilt I did at our retreat in June. I couldn't show it to anyone until the magazine came out, which is why there were no posts about it.


For more information on the design process, visit Quiltmaker Linkin' Logs page And here's a picture of the finished top. It's still unquilted, but it's nicely folded, with backing, in a Kroger bag, like all my other unfinished tops.  And since I did something different with the border so my quilt would have those curls at the corners, I made a web page on my personal website telling people how I did it: 

http://www.forestjane.com/linkin.htm


And let's see, what else haven't I shown here? Oh, the guild I belong to makes blocks for our president. The last president selected a simple tulip block. This is easy and would be great for a spring border. She should have enough for a whole quilt, and with all the tulips in different colors, it should be lovely:


And that takes me up to August, I think.  More later!

Sunday, August 28, 2011

Quilt Class

I took a quilting class today from Anne Lullie on making mosaic quilts. She also gave us some pointers on using the color wheel to help choose fabric. The wallhanging I made in the class is rather brighter than most of my quilts to date:


To be very honest, I don't really like this. Maybe when I get a couple of borders on, I'll like it better. The technique is okay (if you have something in mind for it that'll never be washed)and selecting and trimming and arranging all those little color-squares wasn't all that bad. I also understand how we used the color wheel to select lights and darks and mediums and complimentaries of all these colors, but . . . this is too bright and abstract for me. I don't like that dark curl even though I 'get' the fact that without the darks, it'd just be a confetti of mediums-to-lights. It's too stark.

Guess I'm just stuck in my ways. I do prefer piecing and making a quilt the traditional way using repeated blocks. I can't say I don't like abstracts at all, because most of my quilts have been geometric designs, not picture quilts. I just don't like these colors together one bit. If Anne had led us to the table full of her beautiful hand dyed fabrics and said, "Pick 20 tones and shades you like." I probably wouldn't have selected ANY lime green, neon yellows, no oranges, or mustards. It was probably good to force myself to use these—but I'm not going to hang the finished quilt on my walls!

The quilts I've done for Quiltmaker Magazine are challenging me to expand my color choices, but I'm happier with those fabrics. The carnival themed one in batiks, I like that even though it has oranges and brights, and this latest one I can't show you yet, it's in shades of green, blue, purple on a faintly minty green background. Here's two of the fabrics I've used:


Stay tuned for the reveal on the whole quilt top! I've found I love working in batiks for the whole quilt, and I like the 'hand' of the batik and the color variations you get in one piece of fabric. But I also like tone-on-tones. I'll even admit to liking some calicoes.

Do you find yourself stuck in certain colorways and fabric types? I love scrappy, but tend to grab from a color family to make controlled scrappy. For example, I don't often mix Thimbleberries muted colors with brights or character prints. I've never made a two-color quilt, but would like to some day. Would you? Or is that too bland a quilt?


Saturday, July 30, 2011

Schlep Bag

I saw the pattern link for this on the quiltville chat yahoo group, and had to try it. And since I had some batik out from the last quilt I was working on, I decided to try it in these three cool colorways of the same line.


The pattern is here, free:

Schlep Bag

I changed it just a little by using 6½ inch squares and I made the strap longer so it'd be a shoulder bag instead of a handbag. I made mine reversible too. Instead of batting in the strap, I used a couple of 1½ strips from some old jeans. That made it thicker and stronger but not puffy like batting would be.

Now I want to make one using ultrasuede, maybe a forest green and brown combo. Add a zipper at the top, and a couple of zippered pockets in the lining. Sort of a grown-up version. :)

Friday, July 29, 2011

Split cantaloupes

I've found three like this so far. They're not big or ripe enough to pick yet.


I've still got several more on the vine, I hope they don't split too!


And it's been too hot for the tomatoes too, I've read that they won't set fruit unless it's a little cooler at night than it's been. But I'll keep watering them and maybe I'll get another crop after the boiling days of August are over. Here's the one big tomato I have waiting to ripen, kind of bruised from the storm we had when the whole pot fell over:


And there's a few cherry tomatoes and several pear tomatoes on those bushes too.

Wednesday, July 13, 2011

Hoppin' Jane

Okay, I know it's really called Hoppin' John, lol

But since the fresh stuff was from my garden, I can change the name, right? The black eyed peas looked like they were going to be a LOT more while they were still in the pods, because I had a good sized handful. Here's the harvest:


I dropped one as I was bringing them in, and Libby snatched it up and went running under the kitchen table with it. I never would have thought peas-in-the-pod would be enticing to a Siamese. I rescued it, and pinched off the end of the pod with the kitty fang-holes punched in, but I didn't give it back to her. I don't want to start sharing my peas, lol.

Since after shelling there weren't enough black-eye peas to cook by themselves, I decided to make Hoppin' John with them. First I measured the water for my rice and put it on to heat, then I chopped up that baby bell pepper, added the raw peas and brought it to a boil. Then I added the measured rice and brought it to a boil again, flipped the burner down to low, covered the pot and let it steam for ten minutes. I served it with a sprinkle of grated cheddar on top, and it was superb. Next time I make it, I might add onions and mushrooms. To finish out my meal, I quartered both of those little tomatoes in the picture and dribbled a little italian dressing on them. The pear tomato I'm saving for another night. :)

Friday, July 08, 2011

Early July Cantaloupes and Onions

Cantaloupe! I've got lots growing, luckily they're all different sizes. Only one big one, but five medium size ones, and a handful of thumb down to marble sized babies.


The pear tomato bush is full of clusters of greenish lightbulb shaped tomatoes. I can't wait until they turn solid yellow! They don't taste too much different from a regular cherry tomato, but the seeds are smaller. Something different, and they do look pretty on a salad along with red tomatoes. Plus, the birds don't bother them as much, unlike the cherry tomatoes I had to cover with bird netting.


The Bonnie Original is the tomato plant with the most green ones right now. These two, a couple on the other side, one biggish one near the bottom. A few on the cherry tomato bush too, but still nothing but blooms on the red beefsteak tomato plant.


The onions are doing fine also, getting bigger, but slowly. Here's the largest - do you think I need to put more dirt around it? I haven't tried wiggling or pulling on it, so I don't know how solid it's in there.

Thursday, June 30, 2011

Cantaloupe!

Here's Babyloupe! I never knew that teeny cantaloupes had fuzz, did you? It's about the size of the end of your thumb. It looks soft and . . . pettable here, doesn't it? But it feels a little bristly instead.


Here's my mid-size one. I'm calling her Mamaloupe. She's about the size of a peach.


And here's Daddyloupe, my largest one. He's bigger than a biggish orange. Maybe grapefruit sized? No fuzz left on him. Tomorrow, I plan to hang him in a hammock from the trellis, to take the weight of the melon off the vine. They say that groing them up instead of letting them sprawl on the ground makes for bigger fruit with no blemishes. We'll see!

Tuesday, June 28, 2011

End of June Harvest

Just a quick post—I was away for the weekend and came home to a nice lot of ripe veggies:


That's one last snowpea, but paired with my very first yellow pear tomato. The bush is loaded with them, so I predict a lot more! I also picked six banana peppers, eighteen cherry tomatoes, and two medium sized tomatoes that will be good for slicing. And my black-eye peas are producing pea-pods too! I only saw two pods with peas big enough to pick today, and I've got to admit that I just ate them raw. The peas, I mean, not the pods, lol

How does YOUR garden grow?

Tuesday, June 21, 2011

Spinout Reveal!

Well, today's my reveal day, and I get to show you all what my final Spinout quilt top looks like:


I loved doing this one in batiks, they're so nice to sew on, they don't fray much, and you don't have to be careful of wrong-side or right-side up. It seems when I sew with white-on-white fabric, I always get one square or triangle wrong-side up; by the time I notice it's wrong, it's buried deep in the piecing where it'd take a lot of unsewing to get to it.

The inside of this quilt, Spinout, was designed by Barbara Cline, and if you follow the link, you can get a copy of the magazine with the quilt pattern in it. It's the July/August 2011 issue.

Diane Harris, of Quiltmaker magazine, is blogging about the Scrap Squad's interpretation of the Spinout pattern, and she did a very nice blogpost about my quilt, go look! Lots more details there, and you can also use links to see other Scrap Squad versions of the same pattern:

Scrap Squad Spinout

I also made a tutorial on my website to show people how I made the seminole border—or you could call it a bargello-type border too.

Seminole border Tutorial

Here's a closeup of the border I did:

Now I need to get to work on the next Scrap Squad assignment. This has been so much fun—to get the patterns before anyone else does,and try it in different fabrics. :)

Sunday, June 12, 2011

Cantaloupe on a Trellis

I've been reading online about doing cantaloupes in a container garden, and one site mentioned that you could grow them in less space if you'd train your cantaloupes to grow up a trellis. I stopped on the way home from work the other night and bought two of them. There was a lot of trellises to choose from—wooden ones, plastic ones, fan shaped aluminum ones. I knew I wanted something tall, so I nixed the idea of the 3 and 4 foot versions. There were a lot of wooden ones with diagonal slats hanging on a rack waaaay over my head, but some of them had loose slats already, or slats that had come apart from the outer frame, They were unpainted and looked pretty cheaply made for the price. I didn't want something that was going to last only last one summer. Here's what I got:

They're nicely made, and I liked the idea of NOT having the 2 inch wide slats creating a lot of shade. Plus, I needed a trellis that had horizontal bars as well as vertical bars. Supposedly, when the cantaloupe get baseball sized, you use pantyhose or plastic mesh to make a sling on the trellis to support them, to take the weight off the vine. I have lots of the bird netting I put on my tomato bush, so I'll probably use some of that.

Here's my cantaloupes right now, I've used some saved selvedge to gently encourage the vines to grow toward the trellis. They're not knotted tightly, so I'll be able to shift them as the vines grow. This is my first year for cantaloupe, and I didn't know that the plant has those little curly tendril things like the snowpeas do, to connect them and help them grow up.

And one last garden shot - these are my yellow bell peppers, at golfball size. I wonder how long it'll take them to get ripe? I've never grown them before.

In other news, I've eaten LOTS of cherry tomatoes so far, and handfuls of snow peas. Oh, and three banana peppers. I love it when stuff starts getting ripe, and I can't wait for my first big tomato of the year. :)

Monday, May 30, 2011

A Memorial Day finish

Finally got the binding done on this one—and it's been sitting for YEARS waiting to be bound. I'm such a procrastinator. Had the binding right in the bag with the quilt all this time.


And I was delightfully WRONG about my snowpeas, I ate the first of them today. I know two of them is not a serving, but surely eating them warm and crunchy right off the vine is just as good as a vitamin?

Sunday, May 29, 2011

End of May Garden update

Well, it's the end of May, and here's the State of the Container Garden. My onions are doing okay, and the cauliflower in the wading pool with them are nicely leafy - but no cauliflower showing yet. I keep peeking down into the middle of the leaves, hoping to see something down there, but nothing.

The Better Boy tomato plant has several small and these two bigger green tomatoes:

I have this one nice sized banana pepper (about three inches long) and lots of buds and little ones that're about the size of the end of your pinky finger:


My snowpeas are blooming and there's lots of tiny snowpeas started, all about an inch long, so by June 1, betcha I'll be eating my first snowpea:

Here's the cantaloupe, nothing but lots of green leaves. I'm a long way from needing to trellis these, aren't I? I'm going to try growing them up, and suspending the melons in little mesh sacks attached to the trellis.

The yellow bell pepper plant isn't as far along as the banana pepper, it's just now starting to have little buds:

As for my other tomatoes, they're not doing as well. The Bonnie Original has a couple of little tomatoes on it, as does the yellow pear tomato and the Beefsteak tomato. The winner for this season, so far, is the Cherry tomato. It's thick with tomatoes of all sizes. I've had ONE ripe tomato from this bush so far, the birds pecked holes in several others. Now I've got it surrounded by bird netting. It's difficult to see unless you look at the CD there in the pot:


People have asked me about the CD's. I had heard they'd be birdscare, that the birds would see their reflection and fly away. It hasn't worked this year! I do like watering with them in there though, if you water on the CD, the stream from the hose doesn't dig holes in the dirt, instead it splatters out flat, if that makes sense.

How does YOUR garden grow?

Saturday, May 28, 2011

First Tomato and hotpads

I made a couple of hotpads for Mom for Mother's Day, picking colors that were nice for spring. Here she is holding them:


And here's a closeup. I used some 100% cotton toweling in the middle of the bargello style one, which makes it pretty heatproof. Making a hotpad is a good use for these prairie point stars, since all the layers of fabric are too much for a quilt top anyway. This one didn't need any layers added! Anyone else made one of those way back when?


And here's my first ripe tomato! It's only a cherry tomato, but it was very good. :D

Wednesday, May 04, 2011

Quilts, Tomatoes, Pepper buds!

Ready for some garden pictures? Here's my banana pepper plant, with lots of buds all tucked in the center there. I bet I'll have blooms soon!


Again with the cherry tomato plant, from the top this time, with four easy to spot little green tomatoes, and a few more hiding in the leaves if you really hunt for them.


And last, the current quilt I'm working on. I can't share the whole thing with you, because it's a yet-unpublished pattern from Quiltmaker magazine that the Scrap Squad is doing. But here's a photoshopped picture that gives you a teaser of the colors of batiks that I'm using:

Monday, April 25, 2011

Easter Garden Update

Hope everyone had a good holiday! I was off Friday, had to work Saturday, so it was a short weekend for me, but I did get a little gardening done. Here's my peas on 4.20.11, snow peas on the bottom and black-eye peas on the top. Too many people have been telling me that that's too many to grow in a windowbox.


Here's the same peas 4 days later, to me that seems like a HUGE difference in size of the leaves. I love watching them grow, lol. The snowpeas are vines, and I'll put up a cage for them to grow on, I'm not worried about them. But yeah, I had to agree, the black-eye peas being bushes, they were probably going to quickly outgrow the planter.


So I bought ONE more container, a cheap dishpan from the dollar store, punched some holes in the bottom—to be honest, I cracked a big split in the bottom when I went to punch the holes. I guess I was either too enthusiastic or the dishpan was really cheap! Anyway, I transplanted three of the black-eye pea bushes in there, and put another in the wading pool, in an empty spot next to the cauliflower.

Here's my Husky Red Cherry tomato plant. It gets blog space because it has the most blooms. ;)


I don't know if the recent cool nights we've had (chilly, but all above freezing) will mean these blooms will set fruit or not. Have to wait and see!


And last, the picture above is the current state of the cantaloupe. I know four plants per big container may be too much, but I can always hack one out later, right? Perhaps eliminate the smallest one, or the one with no cantaloupes on it? But I saw online where I can get a trellis to train the vines on, then hang the cantaloupes from the trellis in net bags or pantyhose sections, and that keeps them off the ground, too. Supposedly less chance of mildew or mold.

Sunday, April 10, 2011

More Spring Planting

Went and spent some hard-earned cash at Home Depot last night on the way home from work. Then had to haul the two big bags of dirt, a new plant pot, one more tomato cage, some seeds, and three more plants around to the back patio. Here's what I ended up with. First, that banana pepper plant I said I still wanted:


I was also tempted to try yellow pear tomatoes this year. I think it was Tazzie that mentioned them in response to my problem with birds—because these tomatoes don't get red, birds're less attracted to them. They're about the size of cherry tomatoes, but longer, with an added pear shaped blob. Supposed to taste great too!


I also got some Vidalia onions, a whole little round blob of them. I think you call them starters? Then on my way to the front of the store, I passed a rack with more plants and I couldn't resist some early cauliflowers. These are supposed to be done in 50 days, so if that's true, I'll get a harvest at the beginning of June, before it gets too hot for them. I put those in the wading pool, onions toward the back:


I had so many onions that I put a few in some of the tomato containers, around the edges. It seems like my tomatoes always grow pretty tall, and the roots never extend out to the top edge of the containers, (I plant them deep) so maybe the pairing will work.

So here's the state of my containers now, and I think this'll do me for the summer. I'm not at all sure about the cowpeas in the windowbox—the snow peas do wonderfully there, so maybe these will too? And the cantaloupe in containers is new for me. I may need to get tomato cages for them, and suspend the cantaloupes from the wire with little net bags? I'll have to do some research. All suggestions welcome! How does YOUR garden grow?

Related Posts Plugin for WordPress, Blogger...